

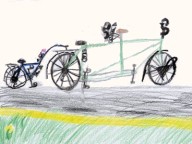
Pour monter une côte en tandem et 3e roue, il faut de tout petits développements.
Il faut de petits développements pour monter les côtes avec un tandem et une troisième roue, et parfois aussi avec un lourd chargement. Et si j’ajoute que ni mes coéquipières ni moi ne sommes de forts grimpeurs et que nous transportons parfois tout le nécessaire à un périple cyclotouristique, il devient alors évident qu’il faut de tout tout petits développements.
Ce tandem est muni de pédaliers FSA Gossamer tandem crankset. Les plateaux y sont fixés par une étoile à 5 branches dont les cercles de boulonnage sont de 130 et de 74 mm de diamètre (130/74). Les plus petits plateaux pouvant y être installés sont :
– petit plateau : minimum 24 dents ;
– moyen plateau : minimum 38 dents.
À l’achat, j’avais demandé que le tandem soit muni des plus petits plateaux possibles, soit 48-38-24 (au lieu de 52-40-30), ainsi que d’une cassette 12-34. Mais même ainsi équipé, je trouvais difficile d’escalader une côte de plus de 7 ou 8 % avec mon plus petit développement (24/34, soit 1,52 m ou 19 pouces).
J’avais exclus dès le départ des bricolages qui m’auraient donné une manivelle droite différente pour le co-pilote. Comme les trois autres manivelles d’une transmission de tandem sont particulières, il me restait les options suivantes :
– trouver une nouvelle manivelle compatible avec le reste de ma transmission ;
– me procurer une nouvelle transmission tandem de montagne avec une étoile à 4 bras (petit plateau de 22 dents minimum) ;
– me procurer une transmission tandem à 5 bras, mais à plus petit diamètre de boulonnage (20 dents minimum);
– me procurer une transmission tandem TA Cyclotouriste avec des diamètres de boulonnage 58/94 mm ou 58/110 mm (20 ou 19 dents minimum.
Ces deux dernières options sont particulièrement dispendieuses, tandis que les autres sont aléatoires. Mais quoi d’autre ? Il existe une ou deux compagnies qui fabriquent des adaptateurs qui permettent d’utiliser des pignons (ou des tout petits plateaux) sur une transmission standard. Un de ces systèmes est le Mountain Tamer Quad.
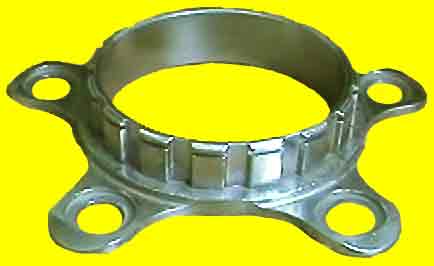
The Mountain Tamer Quad Plus uses this adaptor, onto which slotted cogs are attached. (Photo: Abundant Adventures website)
Abundant Adventures offers the Mountain Tamer Quad Plus, which basically consists of an adaptor, slotted cogs, spacers and a retainer ring. Here is the lowdown.
A few checks have to be made prior to installation. The company website (and their FAQ) highlights the potential pitfalls and is a must-read. In my case, the following checks had to be made.
STI shifters are de-facto incompatible with a quad, because they have precise positions. Likewise, I suspect Ergo shifters would not work. By contrast, current bar-end and downtube use a friction left shifter, which means one may position the shifter whereever necessary rather than in a given notch.
With a bar-end shifter, one needs to check if the shifter will move the derailleur enough to travel across four rings. I moved the chain out of the way and checked that it would work.
Shimano advertises its front derailleurs for 22 teeth capacity. But adding a fourth ring means the derailleur will travel further. When it travels left and right, it also goes up and down. A few measurements showed me that I could go with a 31 or 32-teeth gap between extremes.
In my case, I had about 1-2 mm to spare after installing the fourth ring. Had there been insufficient space, I could have moved the bottom bracket a bit to the right (with a spacer) or I could have installed a new longer bottom bracket.
In my case, the derailleur didn't go close enough to the seattube to allow ideal shifting to the granny. I filed slightly a non-essential piece of metal and the derailleur was able to go closer to the seattube. Problem solved.
Another aspect to consider is chainline. My chainline is good with the outer three chainrings. It means that the new small chainring is definitely "too much inside". Not a problem, as long as it is used with the large cogs only.
Or more specifically is it a long-cage derailleur? I now have 48-18 in front and 11-32 behind, for a total of 51 teeth differencial, rather than the 43 or 45 advertised by Shimano. In practice, it means that the derailleur floats when I am on the small chainring and the 3 smallest cogs. Not a problem.
The Quad adaptor comes with instructions photocopied on paper (i.e. no marketting department here). Instructions were clear, detailed, and I think that anyone with mechanical fingers but no knowhow of crankset repairs will know what to do. I had never touched a cransket before and didn't have any problem to do the work.
Basically, I proceeded as follows:
– I removed the rear right crank of the tandem and removed the inner ring I had. I was left with a "double crankset" with its 48-38 rings bolted on the outer 130-mm bolt circle.
– Since the inner ring was bolted on integrated bosses (i.e. no spacers), I had to file these bosses to install the quad adaptor. It took me about 30 minutes of careful filing, but I ended up with a neat job, no scratches on the central ring, etc.

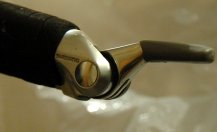
A view from the top, showing the clearance between inner ring and chainstay, as well as the makeshift stopper

This picture shows the amount of clearance I have between the chainring and derailleur when I am in high gear. At the other end, the chain is on the second cog.
– It is then a simple procedure to install the adaptor and the two rings which are, I think, NOS Suntour cogs, plus the spring and the lock ring.
I could have moved out the crank a bit, either by installing a 1 or 2 mm
spacer on the bottom bracket to move it out a bit, or by installing a new
bottom bracket. Although I bought the 1 mm spacer, I didn't need to install it.
Incidentally, if I had to install the spacer, I would have needed to visit a bike repair site (ex. Park Tools), because Abundant Adventure's instructions do not detail this specific installation.
– Shifting towards the granny was unreliable. Sometimes it shifted well, sometimes too much and sometimes not at all. I installed a homemade stopper to prevent the chain from falling onto the bottom bracket. That way, the chain always stays put. Problem solved.
The tandem used a Shimano Ultegra front derailleur. Even though it shifted all four rings, downshifting towards the first two rings was never perfect and upshifting to the largest ring was sometimes hard. Then one day, the derailleur cage broke.
I replaced it with a Shimano 105 derailleur: same looks, same functionnality (it seems) and cheaper.
The results surprised me quite pleasantly. All shifts are now smooth and non problematic. In other words, the 105 works better than the Ultegra.


Two views of the drivetrain with the Mountain Tamer Quad: in high (top) and low gear(bottom).
The black plastic collar seen on the seattube (it looks like it is just above the left chain) is my homemade chain stopper. It started its life as the part to attach a MEC taillight to the seatpost.
I am very pleased with the result, especially with the new derailleur. There are a few points to note:
– In theory, my chainline is not perfect. In practice, it is probably better that way
– The small granny is used with only the 3 (or 4) largest cogs, so the fact it's useable with only the 4 largest cogs is not a limitation.
– The second ring is now useable only with the first 5 cogs, and then the chain rubs slightly against the 3rd ring (38). I think I will modify the 38 to move it 0.5 mm closer to the 48, so I'll be able to use the 2nd ring with the first 6 or 7 cogs. Not that I plan to ride with an oblique chainline, but it's nice to be able to...
– The third chainring works with all nine cogs. Is it the ring I use most of the time and I do use it through all nine cogs (though mostly with cogs 1 or 2 to 8).
– The fourth chainring works fine with all but the largest cog. And I can use the large–large combo without breaking anything.
No. Having such low gears allow me to climb hills while spinning at a good clip, at 60-70 revolutions per minute. Keeping the bike upright is obviously more difficult at 5-8 km/h than it is at 30 km/h, but for a given speed, it is much easier to keep it upright when one spins at a good clip than one slugs with difficulty. To make a long story short, in my lowest gear, I typically climb at 4-5 km/h and I have climbed a few at 2.5 or 3 km/h! And in spite of what many think, it is definitely faster and easier than pushing the same heavily loaded bicycle on a steep incline.
An added factor is traction. On sand, snow or ice, I have limited traction on the rear wheel because I have lightweight stokers. It is therefore very important to pedal smoothly to avoir any slippage. Again, very low gears help maintain a smooth pedal stroke.
© 2005 — Mise à jour : 2010-08-16

SITE GLOBAL
GLOBAL SITE
SITE VÉLO
BICYCLING SITE
Vous voulez me contacter ? Voici l’adresse : You want to reach me? Send-me e-mail:
Maquette et conception du site : Site design: Michel Gagnon