
The 1970 bike boom was great in that it popularised bicycles for adults. Alas, it also meant that fenders disappeared as standard equipment on bicycles. Selling them apart was probably was a way to increase profits, or maybe it was a sign that the bike boom started in California, but some people might argue that it was a machination to prevent using bicycles as a bona fide transportation vehicle.
There are many arguments against fenders. Some are afraid that their bike might weight a few hundread grammes more, others are afraid that the added drag might make them loose 0.1 km/h on their top speed and yet others don’t find them “sexy” enough. Quite frankly, I see only two reasons to avoid fenders:
– if you never ride in the rain, on wet roads or even in puddles;
– if you ride offroad, especially in mud that sticks to everything.
As for cycling on streets and highways... has anyone noticed that it often rains in Québec as well as in most parts of North America and Europe? Well, how about getting into the office dressed like a skunk, with a black stripe in the middle of a yellow rain coat? Lovely, isn’t it?
Full fenders do prevent such problems. However, they leave feet unprotected. The obvious solution – lengthening the front fender – is problematic because a long fender would break when going down a curb (even off the bicycle). So there must be another way.
I borrowed the idea from Alex Wetmore. His page shows how to do efficient and cheap mudflaps that improve greatly on the protection offered by full fenders. On his page, he expands on reasons to use mudflaps and explains in great details how to make them.
I will therefore only explain the differences between his design and mine.
Around here protective rubber mat is sold by the metre. I would suggest using the cheapest rubber availabe as it is also lighter. So far, I only replaced one mudflap, after 3 years of daily use.
Tip:
– Rubber mat material is cheap. Experience tells me that it's preferable to cut too long strips, and then cut them further to proper length once they is installed on the bike.
I carefully drill four holes 15 mm (1/2 inch) apart in the fender and in the mudflap.I use black zip ties to attach the mudflap to the fender. To improve on rigidity, I make sure one of the zip ties is secured near the fender stay.
Tips:
– With experience, I found that it is easier to drill only two holes, then attach the mudflap, then drill the other two holes through mudflap and fender while the mudflap is attached to the fender.
– Because water runs up the rear of the tire, I install the mudflap inside the fender.
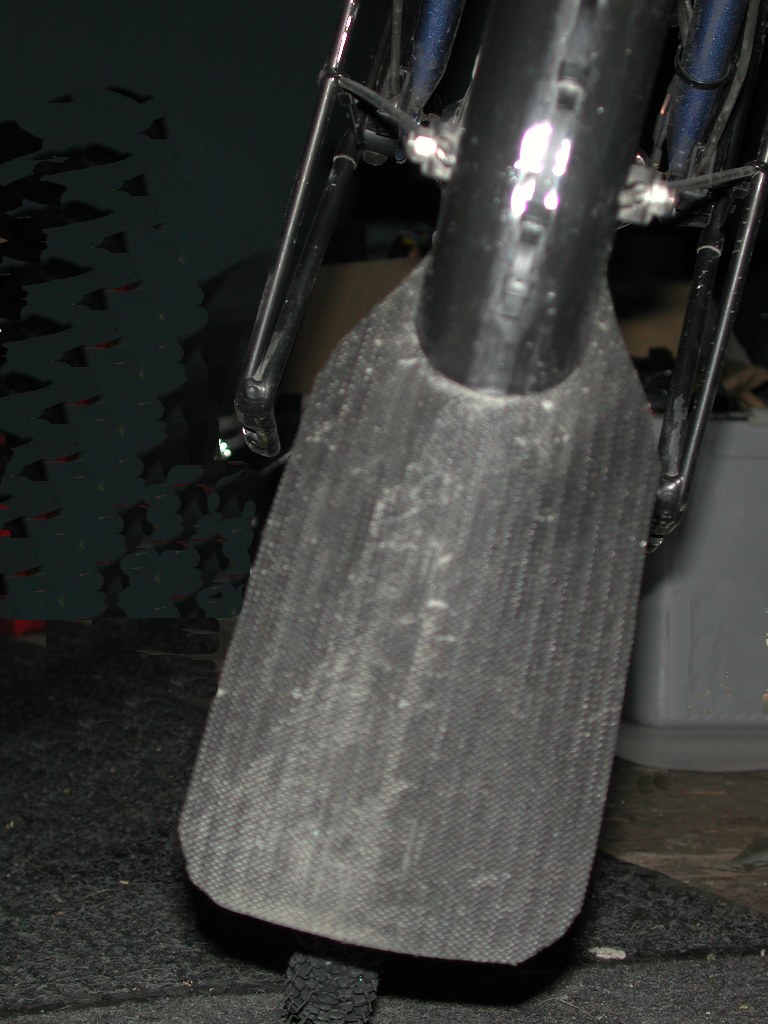
This is a close-up view of a front mudflap. Near the top, you will notice one of the zip ties.
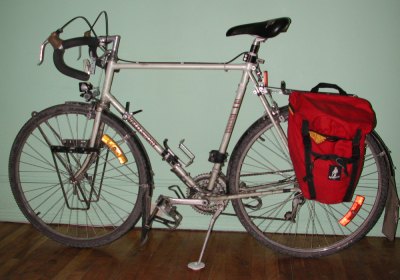
This is a view of a rear end of my touring bike, which shows the mudflap, reflectors and reflective materials.
The mudflap has two amber reflectors and a barely-visible red one underneath. Also permanently installed are one Vistalite SuperNebula taillight on the seatpost (not shown), as well as a a behind-the-rack post with one Vistalite SuperNebula taillight, one MEC taillight and one vertical amber reflector. There is also a red and white reflective stripe on the fender. It's overkill for city riding, but necessary for highway riding at night.
Usefulness
The front mudflap not only keeps your feet dry, but it also protects the drivetrain from a lot of road grime. It keeps my bottom bracket running for many years even in rain, snow or ice and decreases chain wear as well.
Design:
It is about 100-120 mm wide (4-4.5 in wide) and goes to within 60-80 mm off the ground.
– Start with a rectangular stripe that is 130 mm wide by 500 mm long (5 in x 20 in), with the ridges going lengthwise.
– Narrow the top 80 mm to fender width (35-45 mm), so it fits into the fender, and taper the mudflap on a further 60 mm in length.
– Carefully drill four holes in the fender and mudflap as explained above. Attach it with two zip ties to the fender.
– Narrow slightly the mudflap so it is symmetrical.
– Cut it to length. I typically cut the flap to 50-60 mm off the ground and go cycling; I then cut it a little bit more if I hear it drag on speed bumps or if I feel like I am shovelling too much snow with it. Generally, mudflaps end up around 60-80 mm (2.3-3.1 in) off the ground.
Usefulness
Contrary to the front one, it is mostly useful for other people. Normal fenders should protect people following you, unless they follow too closely or unless you ride in a tight formation (at a brevet, for instance). But the protection offered by a rear fender is inadequate in snow, or if you ride with a child trailer or a trailercycle. And I use both vehicles.
The rear mudflap is also a great place to install large automotive reflectors, as they are visible from further away than multi-directional bicycle reflectors. Locating these reflectors relatively low makes them visible from far away, even when car drivers have dipped their headlights.
Design:
It is about 120-130 mm wide (4.8-5.2 in wide) and goes to within 6-8 cm off the ground.
– Start with a rectangular stripe that is 140 mm wide by 600 mm long (5 in x 24 in), with the ridges going lengthwise.
– Narrow the top 80 mm to fender width (35-45 mm), so it fits into the fender, and taper the mudflap on a further 70 mm in length.
– Carefully drill four holes in the fender and mudflap as explained above. Attach it with two zip ties to the fender.
– Install reflectors on the mudflap and narrow slightly the mudflap so it is symmetrical.
Auto reflectors found at major auto parts stores are great. Canadian Tire sells large amber and red automotive oblong reflectors that are 2.5" x 5". They have an adhesive backing that works fairly well, but also two holes that allow one to secure them onto the mudflap.
• Peel off the protective paper and stick one (or two) amber reflector and one red reflector on the mudflap.
• Narrow the mudflap to suit.
• Carefully drill a hole through the mudflap vis-à-vis the existing hole at each end of the reflectors, and secure them in place with zip ties (otherwise, the adhesive won't last long if you ride in sand, mud or snow).
– Cut it to length. I typically cut the flap to 50-60 mm off the ground, then cut it a little bit more if I hear it drag on speed bumps or if I feel like I am shovelling too much snow with it. Generally, mudflaps end up around 60-80 mm (2.3-3.1 in) off the ground.
In the same vein, I have added red and white reflective tape (the Transport-Canada-approved one sold to install on trucks) on the rear fender. Not only does it improves on nighttime conspicuousness, but it also makes me more visible in low-light situations.
© 2004 — Updated on: 2010-08-16

SITE GLOBAL
GLOBAL SITE
SITE VÉLO
BICYCLING SITE
Vous voulez me contacter ? Voici l’adresse : You want to reach me? Send-me e-mail:
Maquette et conception du site : Site design: Michel Gagnon